Creating Wireframes like a Pro with Google Slides - Free Toolkit
To be able to offer high quality ad-free content for the readers, some Explained articles contain affiliate links, which may receive a small commission at no additional cost to readers.
 Wireframing Toolkit for Google Slides with Basic UI components and templates for mobile, tablet and laptop
Designers are used to work with multiple shiny prototyping tools such as Adobe xD, InVision, Axure, Sketch, Figma, proto.io and so on. I have also used all of these in the past projects and during my Master studies in Human Computer Interaction and Design. However, in real life, I have noticed many companies do not care which tool you use for prototyping. Especially in the beginning of the project, your main focus should be the interaction and the features rather than the shiny visual details of your application. If you introduce detailed icons and styles for customers before the features and overall purpose have been decided, customers’ focus tend to be in that one icon that confuse them or the background colour they dislike instead of seeing the the important features and interactions of the application as a whole.
Making simple wireframes is an important step in any new software product and you will save tons of time later on if you do it properly. However, you don’t necessarily need to pay for complex design software to create beautiful wireframes. As a designer-developer working with the whole flow from wireframing to release, I have found that using Google Slides to sketch out simple interaction flows and feature screens is a surprisingly convenient way to discuss which features should be implemented and get feedback from users and colleagues in the early phases of the product development.
Explained is an online magazine offering free resources for small business owners, developers and designers to level up their career. To be able to continue offering ad-free content for the readers, Explained articles can contain affiliate links, which may earn commission without no additional cost at the readers.
Why should I use Google Slides for wireframing?
People already know how to use it
Most of the people have already used Google Slides and the comment feature that is used in all Google Drive products. This means that stakeholders has usually no learning curve to share their feedback unlike when using many other prototyping software. Also, you don’t have to be a designer to do small changes to the prototype like legal copy text fixes which frees up designer’s valuable time.
Free easy access
There are no costs to use it and pretty much everyone can access to it. You can decide who you share the link with by press of a button. Compared to paper wireframes and many prototyping software, it is also easier to update for a newbie.
Multiple users realtime
It works on the cloud: everyone sees changes realtime and no problem if you need to switch laptop in between. Backups are automatic and you can make sure your latest version is always saved.
Support for clickable prototypes
You can do also interactive clickable prototypes on Google Slides to simulate full interaction flow and every button press your users will take when using actual software.
Automatic version history
You will see exactly who did which change and when, and you can always revert back to earlier version - all this is done automatically on the background.
Flexibility
Based on experience in playing around with dozens of prototyping software, I can comfortably say that in Google Slides you have all features you need for basic wireframing. You have also possibility to to drop in extra slides like title slides, sitemap, questions, comments etc. to structure your flow better. In many prototyping software you only see screens in presentation mode. Google Slides also allows you to customize themes and so called “Master Slides” if needed but in basic wireframing usually this is already unnecessary.
How to create wireframes with Google Slides in 7 simple steps
1. Make a slide with basic components and reuse them

A good starting point is to make simple slide of the basic templates you need so that you can just reuse them later. If you have static parts that are same on all screens like navbar, you can add these to Master Slide to use this as a non-interactive “water stamp” on the background. In this template, I have created master slides for mobile, tablet, and laptop with some common layouts as well as basic UI components for copy/pasting. The link is view only to make sure no one else is will edit the template accidentally but you can start using it in your own projects by making a copy of it.
2. Group elements

One of the best ways to keep your UI components clean and move them around is to group related elements together. While this is not necessary, this may save a lot of time and gives your UI prettier look. For example, If you have a group of checkboxes, it might make sense to group them together so you can move them around.
- To select items that belong to same group, hold command ⌘, (on Windows CTRL) and click items you want to group. If you have multiple items, you can also draw a box on top of them.
- Right click and select “Group” OR use the keyboard shortcut command ⌘ + Option + G (on Windows replace command with CTRL).
3. Add explanations when needed

Some say UI is like a joke, if you have to explain it, it is not probably that good. However, especially if you are not making clickable prototype, sometimes you might need to add some explanations to tell others what is happening on the prototype. For this I usually go with callout bubble which is a built-in shape in Google Slides. This way others can see your important notes also in presentation mode. If you don’t want the comments to be visible on the presentation mode, you can write the comments outside the canvas or use comment feature (see step 6).
4. Add interaction flows (clickable prototype)

In early phases of the design this is not necessary but once the features and screens start to form, it is good to test the interactions with so called clickable prototypes. This allows designers to detect the fraction in the overall user flow.
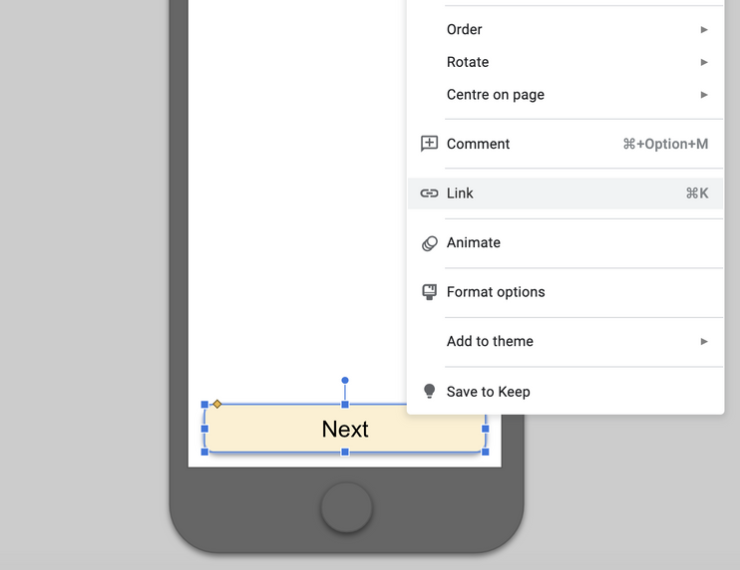
In google slides, building paths from one slide to another is very simple.
- Right click the item you want to add interaction to, such as button, link etc. Select “Link” from the menu
- Select slide you want to link each other. For example selecting “Next Slide” will add a trigger to the button to move on to the next slide once the button is clicked. This makes the flow more natural than using arrow keys for example.
Linking also allows you to build alternative paths. On onboarding screen you might have for example a button “Next” and button “Skip”. By linking the button clicks to slides, you can simulate the actual flow of the application moving user to next step if “Next” button is clicked and moving user to the end of onboarding if “Skip” is clicked. Similarly links can be used also in back buttons to move on to previous step.
Tip: name of the slides in the dropdown are defined by the slide title. This is the default title on the slides that comes from Master slides (default titles when selecting a template from top left “+” sign). If you don’t want to show the title on presentation but want to keep it as linkable slide title, one trick is to drag it outside the canvas instead of removing it. If slide has no title (e.g. Slide 1) you can add title by copy pasting a title from another slide that has a title.
5. Share with others
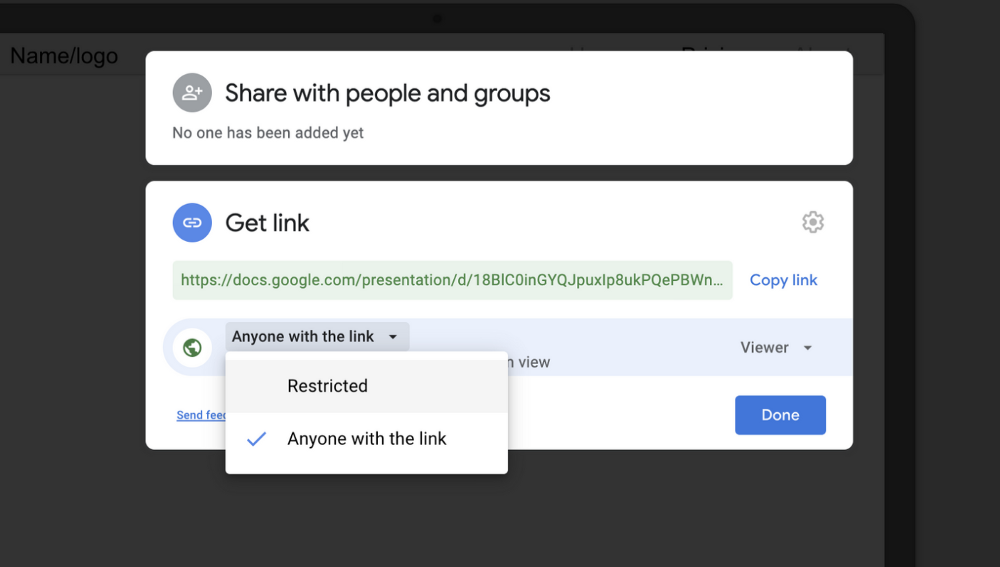
When you want to show your prototype for others or add collaborators, on the very top of Google Slides you have big yellow button to “Share” your wireframe with others. You can do this by inviting specific email addresses or just copy paste the link and give access to anyone with the link to take a look.
6. Collect feedback

You can access the comment menu by using right click > Comment or Command ⌘+Option+M. In the comment box, you can mention others and they will be informed via email automatically. You can also solve the comments when they have been addressed.
7. Take advantage of version history
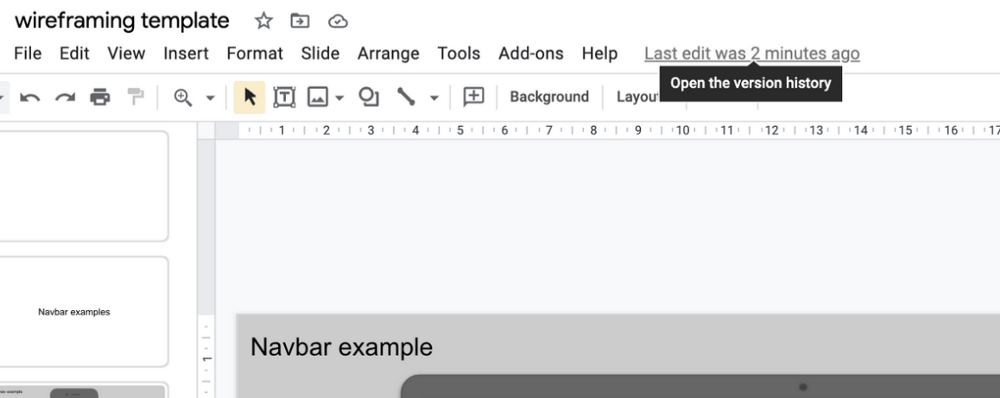
You can access version history on top of the page where it tells you when the slides were last edited. In version history, you see exactly who did what changes and you can always revert back to older version.
Comparing to many professional prototyping software, I have noticed Google Slides provides one of the simplest and fastest workflow to communicate with the team in early phases of the design process, especially if the team is not familiar with other prototyping tools beforehand.
However, it is good to note that if you are working with mutiple designers, your project is large or you need hi-fi clickable prototype to test the interactions with real users, it is best to do that with dedicated prototyping software such as Figma instead. Also whiteboarding software Miro has nowadays tools dedicated for wireframing that are well suited for non-designers as well. For small to midsize projects Google Slides is often still a good starting point and drawing the frames can be done also in a workshop like environment realtime to make sure everyone is talking about the same thing from the very beginning which reduces costly changes during hi-fi or coding implementation.


